We will start from our Linux attack host without domain user credentials. It’s a common thing to start a pentest off in this manner. Many organizations will wish to see what you can do from a blind perspective, such as this, before providing you with further information for the test. It gives a more realistic look at what potential avenues an adversary would have to use to infiltrate the domain. It can help them see what an attacker could do if they gain unauthorized access via the internet (i.e., a phishing attack), physical access to the building, wireless access from outside (if the wireless network touches the AD environment), or even a rogue employee. Depending on the success of this phase, the customer may provide us with access to a domain-joined host or a set of credentials for the network to expedite testing and allow us to cover as much ground as possible.
Below are some of the key data points that we should be looking for at this time and noting down into our notetaking tool of choice and saving scan/tool output to files whenever possible.
Key Data Points
| Data Point | Description |
|---|---|
AD Users | We are trying to enumerate valid user accounts we can target for password spraying. |
AD Joined Computers | Key Computers include Domain Controllers, file servers, SQL servers, web servers, Exchange mail servers, database servers, etc. |
Key Services | Kerberos, NetBIOS, LDAP, DNS |
Vulnerable Hosts and Services | Anything that can be a quick win. ( a.k.a an easy host to exploit and gain a foothold) |
TTPs
Enumerating an AD environment can be overwhelming if just approached without a plan. There is an abundance of data stored in AD, and it can take a long time to sift if not looked at in progressive stages, and we will likely miss things. We need to set a game plan for ourselves and tackle it piece by piece. Everyone works in slightly different ways, so as we gain more experience, we’ll start to develop our own repeatable methodology that works best for us. Regardless of how we proceed, we typically start in the same place and look for the same data points. We will experiment with many tools in this section and subsequent ones. It is important to reproduce every example and even try to recreate examples with different tools to see how they work differently, learn their syntax, and find what approach works best for us.
We will start with passive identification of any hosts in the network, followed by active validation of the results to find out more about each host (what services are running, names, potential vulnerabilities, etc.). Once we know what hosts exist, we can proceed with probing those hosts, looking for any interesting data we can glean from them. After we have accomplished these tasks, we should stop and regroup and look at what info we have. At this time, we’ll hopefully have a set of credentials or a user account to target for a foothold onto a domain-joined host or have the ability to begin credentialed enumeration from our Linux attack host.
Let’s look at a few tools and techniques to help us with this enumeration.
Identifying Hosts
First, let’s take some time to listen to the network and see what’s going on. We can use Wireshark and TCPDump to “put our ear to the wire” and see what hosts and types of network traffic we can capture. This is particularly helpful if the assessment approach is “black box.” We notice some ARP requests and replies, MDNS, and other basic layer two packets (since we are on a switched network, we are limited to the current broadcast domain) some of which we can see below. This is a great start that gives us a few bits of information about the customer’s network setup.
Scroll to the bottom, spawn the target, connect to the Linux attack host using xfreerdp and fire up Wireshark to begin capturing traffic.
Start Wireshark on ea-attack01
Initial Enumeration of the Domain
┌─[htb-student@ea-attack01]─[~]
└──╼ $sudo -E wireshark

11:28:20.487     Main Warn QStandardPaths: runtime directory '/run/user/1001' is not owned by UID 0, but a directory permissions 0700 owned by UID 1001 GID 1002
<SNIP>
Wireshark Output
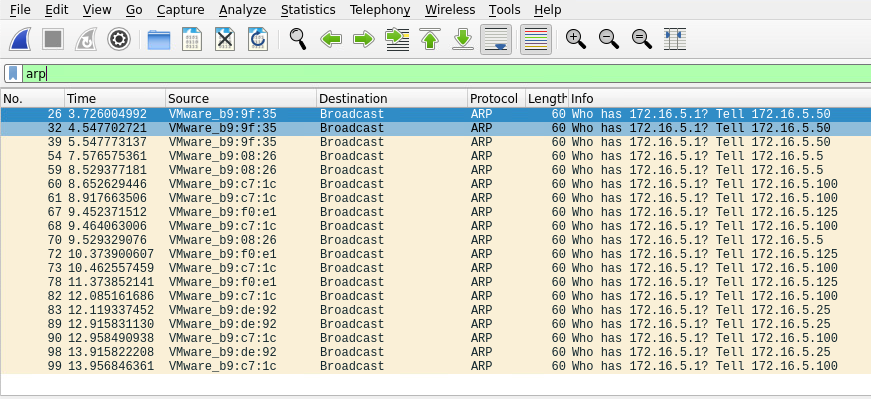
- ARP packets make us aware of the hosts: 172.16.5.5, 172.16.5.25 172.16.5.50, 172.16.5.100, and 172.16.5.125.
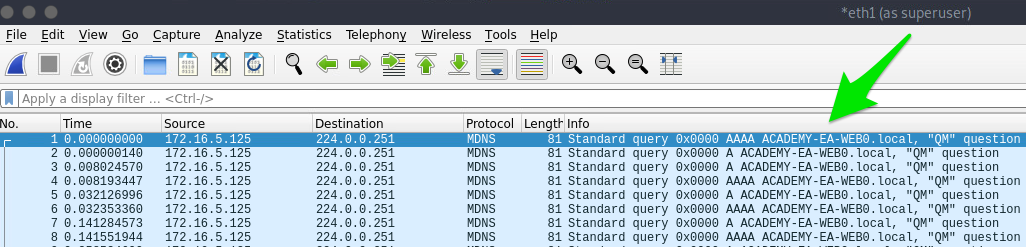
- MDNS makes us aware of the ACADEMY-EA-WEB01 host.
If we are on a host without a GUI (which is typical), we can use tcpdump, net-creds, and NetMiner, etc., to perform the same functions. We can also use tcpdump to save a capture to a .pcap file, transfer it to another host, and open it in Wireshark.
Tcpdump Output
Initial Enumeration of the Domain
Michael Mancuso@htb[/htb]$ sudo tcpdump -i ens224
There is no one right way to listen and capture network traffic. There are plenty of tools that can process network data. Wireshark and tcpdump are just a few of the easiest to use and most widely known. Depending on the host you are on, you may already have a network monitoring tool built-in, such as pktmon.exe, which was added to all editions of Windows 10. As a note for testing, it’s always a good idea to save the PCAP traffic you capture. You can review it again later to look for more hints, and it makes for great additional information to include while writing your reports.
Our first look at network traffic pointed us to a couple of hosts via MDNS and ARP. Now let’s utilize a tool called Responder to analyze network traffic and determine if anything else in the domain pops up.
Responder is a tool built to listen, analyze, and poison LLMNR, NBT-NS, and MDNS requests and responses. It has many more functions, but for now, all we are utilizing is the tool in its Analyze mode. This will passively listen to the network and not send any poisoned packets. We’ll cover this tool more in-depth in later sections.
Starting Responder
Code: bash
sudo responder -I ens224 -A
Responder Results
As we start Responder with passive analysis mode enabled, we will see requests flow in our session. Notice below that we found a few unique hosts not previously mentioned in our Wireshark captures. It’s worth noting these down as we are starting to build a nice target list of IPs and DNS hostnames.
Our passive checks have given us a few hosts to note down for a more in-depth enumeration. Now let’s perform some active checks starting with a quick ICMP sweep of the subnet using fping.
Fping provides us with a similar capability as the standard ping application in that it utilizes ICMP requests and replies to reach out and interact with a host. Where fping shines is in its ability to issue ICMP packets against a list of multiple hosts at once and its scriptability. Also, it works in a round-robin fashion, querying hosts in a cyclical manner instead of waiting for multiple requests to a single host to return before moving on. These checks will help us determine if anything else is active on the internal network. ICMP is not a one-stop-shop, but it is an easy way to get an initial idea of what exists. Other open ports and active protocols may point to new hosts for later targeting. Let’s see it in action.
FPing Active Checks
Here we’ll start fping with a few flags: a to show targets that are alive, s to print stats at the end of the scan, g to generate a target list from the CIDR network, and q to not show per-target results.
Initial Enumeration of the Domain
Michael Mancuso@htb[/htb]$ fping -asgq 172.16.5.0/23

172.16.5.5
172.16.5.25
172.16.5.50
172.16.5.100
172.16.5.125
172.16.5.200
172.16.5.225
172.16.5.238
172.16.5.240

     510 targets
       9 alive
     501 unreachable
       0 unknown addresses

    2004 timeouts (waiting for response)
    2013 ICMP Echos sent
       9 ICMP Echo Replies received
    2004 other ICMP received

 0.029 ms (min round trip time)
 0.396 ms (avg round trip time)
 0.799 ms (max round trip time)
       15.366 sec (elapsed real time)
The command above validates which hosts are active in the /23 network and does it quietly instead of spamming the terminal with results for each IP in the target list. We can combine the successful results and the information we gleaned from our passive checks into a list for a more detailed scan with Nmap. From the fping command, we can see 9 “live hosts,” including our attack host.
Note: Scan results in the target network will differ from the command output in this section due to the size of the lab network. It is still worth reproducing each example to practice how these tools work and note down every host that is live in this lab.
Nmap Scanning
Now that we have a list of active hosts within our network, we can enumerate those hosts further. We are looking to determine what services each host is running, identify critical hosts such as Domain Controllers and web servers, and identify potentially vulnerable hosts to probe later. With our focus on AD, after doing a broad sweep, it would be wise of us to focus on standard protocols typically seen accompanying AD services, such as DNS, SMB, LDAP, and Kerberos name a few. Below is a quick example of a simple Nmap scan.
Code: bash
sudo nmap -v -A -iL hosts.txt -oN /home/htb-student/Documents/host-enum
The -A (Aggressive scan options) scan will perform several functions. One of the most important is a quick enumeration of well-known ports to include web services, domain services, etc. For our hosts.txt file, some of our results from Responder and fping overlapped (we found the name and IP address), so to keep it simple, just the IP address was fed into hosts.txt for the scan.
NMAP Result Highlights
Initial Enumeration of the Domain
Nmap scan report for inlanefreight.local (172.16.5.5)
Host is up (0.069s latency).
Not shown: 987 closed tcp ports (conn-refused)
PORT     STATE SERVICE       VERSION
53/tcp   open  domain        Simple DNS Plus
88/tcp   open  kerberos-sec  Microsoft Windows Kerberos (server time: 2022-04-04 15:12:06Z)
135/tcp  open  msrpc         Microsoft Windows RPC
139/tcp  open  netbios-ssn   Microsoft Windows netbios-ssn
389/tcp  open  ldap          Microsoft Windows Active Directory LDAP (Domain: INLANEFREIGHT.LOCAL0., Site: Default-First-Site-Name)
|_ssl-date: 2022-04-04T15:12:53+00:00; -1s from scanner time.
| ssl-cert: Subject:
| Subject Alternative Name: DNS:ACADEMY-EA-DC01.INLANEFREIGHT.LOCAL
| Issuer: commonName=INLANEFREIGHT-CA
| Public Key type: rsa
| Public Key bits: 2048
| Signature Algorithm: sha256WithRSAEncryption
| Not valid before: 2022-03-30T22:40:24
| Not valid after:  2023-03-30T22:40:24
| MD5:   3a09 d87a 9ccb 5498 2533 e339 ebe3 443f
|_SHA-1: 9731 d8ec b219 4301 c231 793e f913 6868 d39f 7920
445/tcp  open  microsoft-ds?
464/tcp  open  kpasswd5?
593/tcp  open  ncacn_http    Microsoft Windows RPC over HTTP 1.0
636/tcp  open  ssl/ldap      Microsoft Windows Active Directory LDAP (Domain: INLANEFREIGHT.LOCAL0., Site: Default-First-Site-Name)
<SNIP>
3268/tcp open  ldap          Microsoft Windows Active Directory LDAP (Domain: INLANEFREIGHT.LOCAL0., Site: Default-First-Site-Name)
3269/tcp open  ssl/ldap      Microsoft Windows Active Directory LDAP (Domain: INLANEFREIGHT.LOCAL0., Site: Default-First-Site-Name)
3389/tcp open  ms-wbt-server Microsoft Terminal Services
| rdp-ntlm-info:
|   Target_Name: INLANEFREIGHT
|   NetBIOS_Domain_Name: INLANEFREIGHT
|   NetBIOS_Computer_Name: ACADEMY-EA-DC01
|   DNS_Domain_Name: INLANEFREIGHT.LOCAL
|   DNS_Computer_Name: ACADEMY-EA-DC01.INLANEFREIGHT.LOCAL
|   DNS_Tree_Name: INLANEFREIGHT.LOCAL
|   Product_Version: 10.0.17763
|_  System_Time: 2022-04-04T15:12:45+00:00
<SNIP>
5357/tcp open  http          Microsoft HTTPAPI httpd 2.0 (SSDP/UPnP)
|_http-title: Service Unavailable
|_http-server-header: Microsoft-HTTPAPI/2.0
Service Info: Host: ACADEMY-EA-DC01; OS: Windows; CPE: cpe:/o:microsoft:windows
Our scans have provided us with the naming standard used by NetBIOS and DNS, we can see some hosts have RDP open, and they have pointed us in the direction of the primary Domain Controller for the INLANEFREIGHT.LOCAL domain (ACADEMY-EA-DC01.INLANEFREIGHT.LOCAL). The results below show some interesting results surrounding a possibly outdated host (not in our current lab).
Initial Enumeration of the Domain
Michael Mancuso@htb[/htb]$ nmap -A 172.16.5.100

Starting Nmap 7.92 ( https://nmap.org ) at 2022-04-08 13:42 EDT
Nmap scan report for 172.16.5.100
Host is up (0.071s latency).
Not shown: 989 closed tcp ports (conn-refused)
PORT      STATE SERVICE      VERSION
80/tcp    open  http         Microsoft IIS httpd 7.5
|_http-title: Site doesn't have a title (text/html).
|_http-server-header: Microsoft-IIS/7.5
| http-methods:
|_  Potentially risky methods: TRACE
135/tcp   open  msrpc        Microsoft Windows RPC
139/tcp   open  netbios-ssn  Microsoft Windows netbios-ssn
443/tcp   open  https?
445/tcp   open  microsoft-ds Windows Server 2008 R2 Standard 7600 microsoft-ds
1433/tcp  open  ms-sql-s     Microsoft SQL Server 2008 R2 10.50.1600.00; RTM
| ssl-cert: Subject: commonName=SSL_Self_Signed_Fallback
| Not valid before: 2022-04-08T17:38:25
|_Not valid after:  2052-04-08T17:38:25
|_ssl-date: 2022-04-08T17:43:53+00:00; 0s from scanner time.
| ms-sql-ntlm-info:
|   Target_Name: INLANEFREIGHT
|   NetBIOS_Domain_Name: INLANEFREIGHT
|   NetBIOS_Computer_Name: ACADEMY-EA-CTX1
|   DNS_Domain_Name: INLANEFREIGHT.LOCAL
|   DNS_Computer_Name: ACADEMY-EA-CTX1.INLANEFREIGHT.LOCAL
|_  Product_Version: 6.1.7600
Host script results:
| smb2-security-mode:
|   2.1:
|_    Message signing enabled but not required
| ms-sql-info:
|   172.16.5.100:1433:
|     Version:
|       name: Microsoft SQL Server 2008 R2 RTM
|       number: 10.50.1600.00
|       Product: Microsoft SQL Server 2008 R2
|       Service pack level: RTM
|       Post-SP patches applied: false
|_    TCP port: 1433
|_nbstat: NetBIOS name: ACADEMY-EA-CTX1, NetBIOS user: <unknown>, NetBIOS MAC: 00:50:56:b9:c7:1c (VMware)
| smb-os-discovery:
|   OS: Windows Server 2008 R2 Standard 7600 (Windows Server 2008 R2 Standard 6.1)
|   OS CPE: cpe:/o:microsoft:windows_server_2008::-
|   Computer name: ACADEMY-EA-CTX1
|   NetBIOS computer name: ACADEMY-EA-CTX1\x00
|   Domain name: INLANEFREIGHT.LOCAL
|   Forest name: INLANEFREIGHT.LOCAL
|   FQDN: ACADEMY-EA-CTX1.INLANEFREIGHT.LOCAL
|_  System time: 2022-04-08T10:43:48-07:00

<SNIP>
We can see from the output above that we have a potential host running an outdated operating system ( Windows 7, 8, or Server 2008 based on the output). This is of interest to us since it means there are legacy operating systems running in this AD environment. It also means there is potential for older exploits like EternalBlue, MS08-067, and others to work and provide us with a SYSTEM level shell. As weird as it sounds to have hosts running legacy software or end-of-life operating systems, it is still common in large enterprise environments. You will often have some process or equipment such as a production line or the HVAC built on the older OS and has been in place for a long time. Taking equipment like that offline is costly and can hurt an organization, so legacy hosts are often left in place. They will likely try to build a hard outer shell of Firewalls, IDS/IPS, and other monitoring and protection solutions around those systems. If you can find your way into one, it is a big deal and can be a quick and easy foothold. Before exploiting legacy systems, however, we should alert our client and get their approval in writing in case an attack results in system instability or brings a service or the host down. They may prefer that we just observe, report, and move on without actively exploiting the system.
The results of these scans will clue us into where we will start looking for potential domain enumeration avenues, not just host scanning. We need to find our way to a domain user account. Looking at our results, we found several servers that host domain services ( DC01, MX01, WS01, etc.). Now that we know what exists and what services are running, we can poll those servers and attempt to enumerate users. Be sure to use the -oA flag as a best practice when performing Nmap scans. This will ensure that we have our scan results in several formats for logging purposes and formats that can be manipulated and fed into other tools.
We need to be aware of what scans we run and how they work. Some of the Nmap scripted scans run active vulnerability checks against a host that could cause system instability or take it offline, causing issues for the customer or worse. For example, running a large discovery scan against a network with devices such as sensors or logic controllers could potentially overload them and disrupt the customer’s industrial equipment causing a loss of product or capability. Take the time to understand the scans you use before running them in a customer’s environment.
We will most likely return to these results later for further enumeration, so don’t forget about them. We need to find our way to a domain user account or SYSTEM level access on a domain-joined host so we can gain a foothold and start the real fun. Let’s dive into finding a user account.
Identifying Users
If our client does not provide us with a user to start testing with (which is often the case), we will need to find a way to establish a foothold in the domain by either obtaining clear text credentials or an NTLM password hash for a user, a SYSTEM shell on a domain-joined host, or a shell in the context of a domain user account. Obtaining a valid user with credentials is critical in the early stages of an internal penetration test. This access (even at the lowest level) opens up many opportunities to perform enumeration and even attacks. Let’s look at one way we can start gathering a list of valid users in a domain to use later in our assessment.
Kerbrute – Internal AD Username Enumeration
Kerbrute can be a stealthier option for domain account enumeration. It takes advantage of the fact that Kerberos pre-authentication failures often will not trigger logs or alerts. We will use Kerbrute in conjunction with the jsmith.txt or jsmith2.txt user lists from Insidetrust. This repository contains many different user lists that can be extremely useful when attempting to enumerate users when starting from an unauthenticated perspective. We can point Kerbrute at the DC we found earlier and feed it a wordlist. The tool is quick, and we will be provided with results letting us know if the accounts found are valid or not, which is a great starting point for launching attacks such as password spraying, which we will cover in-depth later in this module.
To get started with Kerbrute, we can download precompiled binaries for the tool for testing from Linux, Windows, and Mac, or we can compile it ourselves. This is generally the best practice for any tool we introduce into a client environment. To compile the binaries to use on the system of our choosing, we first clone the repo:
Cloning Kerbrute GitHub Repo
Initial Enumeration of the Domain
Michael Mancuso@htb[/htb]$ sudo git clone https://github.com/ropnop/kerbrute.git

Cloning into 'kerbrute'...
remote: Enumerating objects: 845, done.
remote: Counting objects: 100% (47/47), done.
remote: Compressing objects: 100% (36/36), done.
remote: Total 845 (delta 18), reused 28 (delta 10), pack-reused 798
Receiving objects: 100% (845/845), 419.70 KiB | 2.72 MiB/s, done.
Resolving deltas: 100% (371/371), done.
Typing make help will show us the compiling options available.
Listing Compiling Options
Initial Enumeration of the Domain
Michael Mancuso@htb[/htb]$ make help

help:            Show this help.
windows:  Make Windows x86 and x64 Binaries
linux:  Make Linux x86 and x64 Binaries
mac:  Make Darwin (Mac) x86 and x64 Binaries
clean:  Delete any binaries
all:  Make Windows, Linux and Mac x86/x64 Binaries
We can choose to compile just one binary or type make all and compile one each for use on Linux, Windows, and Mac systems (an x86 and x64 version for each).
Compiling for Multiple Platforms and Architectures
Initial Enumeration of the Domain
Michael Mancuso@htb[/htb]$ sudo make all

go: downloading github.com/spf13/cobra v1.1.1
go: downloading github.com/op/go-logging v0.0.0-20160315200505-970db520ece7
go: downloading github.com/ropnop/gokrb5/v8 v8.0.0-20201111231119-729746023c02
go: downloading github.com/spf13/pflag v1.0.5
go: downloading github.com/jcmturner/gofork v1.0.0
go: downloading github.com/hashicorp/go-uuid v1.0.2
go: downloading golang.org/x/crypto v0.0.0-20201016220609-9e8e0b390897
go: downloading github.com/jcmturner/rpc/v2 v2.0.2
go: downloading github.com/jcmturner/dnsutils/v2 v2.0.0
go: downloading github.com/jcmturner/aescts/v2 v2.0.0
go: downloading golang.org/x/net v0.0.0-20200114155413-6afb5195e5aa
cd /tmp/kerbrute
rm -f kerbrute kerbrute.exe kerbrute kerbrute.exe kerbrute.test kerbrute.test.exe kerbrute.test kerbrute.test.exe main main.exe
rm -f /root/go/bin/kerbrute
Done.
Building for windows amd64..

<SNIP>
The newly created dist directory will contain our compiled binaries.
Listing the Compiled Binaries in dist
Initial Enumeration of the Domain
Michael Mancuso@htb[/htb]$ ls dist/

kerbrute_darwin_amd64  kerbrute_linux_386  kerbrute_linux_amd64  kerbrute_windows_386.exe  kerbrute_windows_amd64.exe
We can then test out the binary to make sure it works properly. We will be using the x64 version on the supplied Parrot Linux attack host in the target environment.
Testing the kerbrute_linux_amd64 Binary
Initial Enumeration of the Domain
Michael Mancuso@htb[/htb]$ ./kerbrute_linux_amd64

    __             __               __
   / /_____  _____/ /_  _______  __/ /____
  / //_/ _ \/ ___/ __ \/ ___/ / / / __/ _ \
 / ,< /  __/ /  / /_/ / /  / /_/ / /_/  __/
/_/|_|\___/_/  /_.___/_/   \__,_/\__/\___/

Version: dev (9cfb81e) - 02/17/22 - Ronnie Flathers @ropnop

This tool is designed to assist in quickly bruteforcing valid Active Directory accounts through Kerberos Pre-Authentication.
It is designed to be used on an internal Windows domain with access to one of the Domain Controllers.
Warning: failed Kerberos Pre-Auth counts as a failed login and WILL lock out accounts

Usage:
  kerbrute [command]

  <SNIP>
We can add the tool to our PATH to make it easily accessible from anywhere on the host.
Adding the Tool to our Path
Initial Enumeration of the Domain
Michael Mancuso@htb[/htb]$ echo $PATH
/home/htb-student/.local/bin:/snap/bin:/usr/sandbox/:/usr/local/bin:/usr/bin:/bin:/usr/local/games:/usr/games:/usr/share/games:/usr/local/sbin:/usr/sbin:/sbin:/snap/bin:/usr/local/sbin:/usr/sbin:/sbin:/usr/local/bin:/usr/bin:/bin:/usr/local/games:/usr/games:/home/htb-student/.dotnet/tools
Moving the Binary
Initial Enumeration of the Domain
Michael Mancuso@htb[/htb]$ sudo mv kerbrute_linux_amd64 /usr/local/bin/kerbrute
We can now type kerbrute from any location on the system and will be able to access the tool. Feel free to follow along on your system and practice the above steps. Now let’s run through an example of using the tool to gather an initial username list.
Enumerating Users with Kerbrute
Initial Enumeration of the Domain
Michael Mancuso@htb[/htb]$ kerbrute userenum -d INLANEFREIGHT.LOCAL --dc 172.16.5.5 jsmith.txt -o valid_ad_users

2021/11/17 23:01:46 >  Using KDC(s):
2021/11/17 23:01:46 >   172.16.5.5:88
2021/11/17 23:01:46 >  [+] VALID USERNAME:       jjones@INLANEFREIGHT.LOCAL
2021/11/17 23:01:46 >  [+] VALID USERNAME:       sbrown@INLANEFREIGHT.LOCAL
2021/11/17 23:01:46 >  [+] VALID USERNAME:       tjohnson@INLANEFREIGHT.LOCAL
2021/11/17 23:01:50 >  [+] VALID USERNAME:       evalentin@INLANEFREIGHT.LOCAL

 <SNIP>

2021/11/17 23:01:51 >  [+] VALID USERNAME:       sgage@INLANEFREIGHT.LOCAL
2021/11/17 23:01:51 >  [+] VALID USERNAME:       jshay@INLANEFREIGHT.LOCAL
2021/11/17 23:01:51 >  [+] VALID USERNAME:       jhermann@INLANEFREIGHT.LOCAL
2021/11/17 23:01:51 >  [+] VALID USERNAME:       whouse@INLANEFREIGHT.LOCAL
2021/11/17 23:01:51 >  [+] VALID USERNAME:       emercer@INLANEFREIGHT.LOCAL
2021/11/17 23:01:52 >  [+] VALID USERNAME:       wshepherd@INLANEFREIGHT.LOCAL
2021/11/17 23:01:56 >  Done! Tested 48705 usernames (56 valid) in 9.940 seconds
We can see from our output that we validated 56 users in the INLANEFREIGHT.LOCAL domain and it took only a few seconds to do so. Now we can take these results and build a list for use in targeted password spraying attacks.
Identifying Potential Vulnerabilities
The local system account NT AUTHORITY\SYSTEM is a built-in account in Windows operating systems. It has the highest level of access in the OS and is used to run most Windows services. It is also very common for third-party services to run in the context of this account by default. A SYSTEM account on a domain-joined host will be able to enumerate Active Directory by impersonating the computer account, which is essentially just another kind of user account. Having SYSTEM-level access within a domain environment is nearly equivalent to having a domain user account.
There are several ways to gain SYSTEM-level access on a host, including but not limited to:
- Remote Windows exploits such as MS08-067, EternalBlue, or BlueKeep.
- Abusing a service running in the context of the
SYSTEM account, or abusing the service accountSeImpersonateprivileges using Juicy Potato. This type of attack is possible on older Windows OS’ but not always possible with Windows Server 2019. - Local privilege escalation flaws in Windows operating systems such as the Windows 10 Task Scheduler 0-day.
- Gaining admin access on a domain-joined host with a local account and using Psexec to launch a SYSTEM cmd window
By gaining SYSTEM-level access on a domain-joined host, you will be able to perform actions such as, but not limited to:
- Enumerate the domain using built-in tools or offensive tools such as BloodHound and PowerView.
- Perform Kerberoasting / ASREPRoasting attacks within the same domain.
- Run tools such as Inveigh to gather Net-NTLMv2 hashes or perform SMB relay attacks.
- Perform token impersonation to hijack a privileged domain user account.
- Carry out ACL attacks.
A Word Of Caution
Keep the scope and style of the test in mind when choosing a tool for use. If you are performing a non-evasive penetration test, with everything out in the open and the customer’s staff knowing you are there, it doesn’t typically matter how much noise you make. However, during an evasive penetration test, adversarial assessment, or red team engagement, you are trying to mimic a potential attacker’s Tools, Tactics, and Procedures. With that in mind, stealth is of concern. Throwing Nmap at an entire network is not exactly quiet, and many of the tools we commonly use on a penetration test will trigger alarms for an educated and prepared SOC or Blue Teamer. Always be sure to clarify the goal of your assessment with the client in writing before it begins.
Let’s Find a User
In the following few sections, we will hunt for a domain user account using techniques such as LLMNR/NBT-NS Poisoning and password spraying. These attacks are great ways to gain a foothold but must be exercised with caution and an understanding of the tools and techniques. Now let’s hunt down a user account so we can move on to the next phase of our assessment and start picking apart the domain piece by piece and digging deep for a multitude of misconfigurations and flaws.